Showing posts with label and. Show all posts
Showing posts with label and. Show all posts
Tuesday, March 4, 2014
Building a Simple and Cheap Woodworking Bench
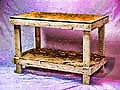
If you are looking for a woodworking bench, you can buy it or, you can make your own. If you are new to woodworking, then I highly recommend that you make your own bench so that you can practice. Here is how you build your simple and cheap woodworking bench.
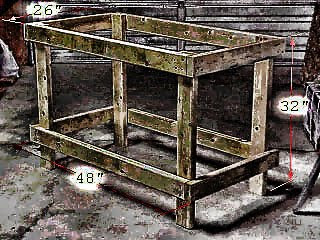
1. Overall bench dimensions
The bench is 26’’ x 48” x 32” (deep x width x height)
2. Materials required for this project
a. OSB
b. 2”x4”
c. Deck Screws
3. The Pieces
a. For Side Rails, cut the 2”x4” to 45" long. Make 4 pieces
b. For Legs, cut the 2”x4” to 32" long. Make 4 pieces
c. For End Rails, cut the 2”x4” to 26" long. Make 4 pieces
d. Get 2 pieces of 26" x 48"OSB

4. How to assemble the side assembly
Place the lower rail 6” away from the bottom of the legs. You can use a 90 degree ruler to ensure the rail is 90 degree with the legs. Screw the joints together, with 4 screws each joint. In the process, the side frame will be "squared up".
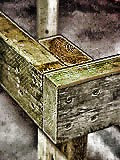 5. How to assemble the frame assembly
Attached the end rails to the side frames. Then, turn over the two sides and ready for clamping and joining. The corners are joined using 3" deck screws.
Then attach the OSB (the shelve) with 1-5/8" deck screws.
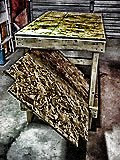 6. How to install the lower shelf
Make rectangular notches, with the size of 3" x 5" at each corner of the OSB. This will allow the OSB to fit around the legs.
To get the OSB in place, you need to angle it and attach it with short deck screws.
That is all there is to make your own woodworking bench.
Recommended Instant Access To 14,000 Woodworking Plans & Projects

Monday, February 24, 2014
GEORGEs NEW LADY and the BEDSIDE white nightstand
Hanging out just down the road at one of those Saturday morning get togethers
*AKA* yard sale
Shes was a cheap date at only $2.70

With the rainbow of colors and vintage feel we have decided to finish the kitchen in,
she was destined to come home with us.

This is the before picture of the now COFFEE STATION.
Thats an old AC unit that started to smell very odd the last 2 yrs so it was removed.

Transition Period,
with the old coffee maker and vintage printers stamp drawer.

NEW and IMPROVED
She greets George every morning with his new coffee maker
and hot H2o system, for my tea.
On another note:
I finished off the perfect little bedside table.

Smooth white creamy finish.

White flower knobs on 3 drawers.


Its a great table made of solid pine.


This time around I didnt have to put feet on, it came this way.

Sharing at:

Thursday, February 20, 2014
Scrap Wood Project Yarn Bowl Discussion and Plans
Hi Everyone,
Well, its gotten much cooler here and rainy too. What kind of weather is this? Yes, wood turning weather!!
Ok, our next project is a scrap wood project and here is the discussion behind this:
Discussion
I had some 12"x1" pine boards left over from a recent project along with a piece of 12"x2"western red cedar that I had been eyeing for a couple of days and wondering what I could do with all of it. I suddenly got the idea to laminate them all together and make a yarn bowl. Linda, my buddy who tests a lot of my kitchen ware, is also an amazing knitter and I got the idea she might like to try out a yarn bowl for me. I emailed her and she said yes but to make it deep with a wide bottom so it cant easily tip over. So this is what were going begin making today.
Plans
I am going to make the bowl out of yellow pine with a red cedar bottom. If you google the words yarn bowl youll see what they look like-typically a large, flat bottomed bowl with either several large holes drilled into the side or a hole-slot combination. The hole-slot thing allows the knitter to pass the yarn through the hole without having to break the yarn and it keeps the yarn in the bowl while its being knitted.
I used 8 - 12"x1" pine boards and cut them into 11" circles and I did the same thing with the red cedar. Im going to coat them liberally with wood glue, clamp them, and let the whole thing dry overnight.
Lets take a look at some photos:
Here is the stack ready for gluing. The whole thing is about 7"high and 11" wide and even though it looks huge in the photo, its not very heavy, which is important for my lathe as I dont want to exceed the operational limits by turning too heavy a block. You can also see a line on the side-Ive drawn that line on the edges of the boards to keep the end grain patterns lined up:

Im going to use carpenters glue and an old pain brush to spread the glue around. Ive also laid down a plastic trash bag to help keep some of the glue off of my work bench:

I cleaned all the wood dust off of the surfaces and applied a very thick bead of glue:

Next I spread the glue evenly across the surface, making sure that the edges have a thick, even layer:

And I did that repeatedly. Here is what the whole thing looks like at the moment:

Now, for difficult part: clamping the whole thing together. Laminated turning blocks need to be really solid and this means having enough clamps to produce even, hair-line joints in the block and ultimate in the bowl itself. I used as many clamps as I can fit around the edge of the block, which in this case was 8 clamps:

Screwing down the clamps always makes the wood shift around a little so its helpful to have a mallet, in the photo you can see I use a plastic mallet, to gently tap it in place:

And then I clamped the hell out of it. Screw it down as tightly as possible. You should see glue oozing out of the sides of the block:

And Im going to let it sit for 24 hours. Well come back to this tomorrow.
VW
Read More..
Well, its gotten much cooler here and rainy too. What kind of weather is this? Yes, wood turning weather!!
Ok, our next project is a scrap wood project and here is the discussion behind this:
Discussion
I had some 12"x1" pine boards left over from a recent project along with a piece of 12"x2"western red cedar that I had been eyeing for a couple of days and wondering what I could do with all of it. I suddenly got the idea to laminate them all together and make a yarn bowl. Linda, my buddy who tests a lot of my kitchen ware, is also an amazing knitter and I got the idea she might like to try out a yarn bowl for me. I emailed her and she said yes but to make it deep with a wide bottom so it cant easily tip over. So this is what were going begin making today.
Plans
I am going to make the bowl out of yellow pine with a red cedar bottom. If you google the words yarn bowl youll see what they look like-typically a large, flat bottomed bowl with either several large holes drilled into the side or a hole-slot combination. The hole-slot thing allows the knitter to pass the yarn through the hole without having to break the yarn and it keeps the yarn in the bowl while its being knitted.
I used 8 - 12"x1" pine boards and cut them into 11" circles and I did the same thing with the red cedar. Im going to coat them liberally with wood glue, clamp them, and let the whole thing dry overnight.
Lets take a look at some photos:
Here is the stack ready for gluing. The whole thing is about 7"high and 11" wide and even though it looks huge in the photo, its not very heavy, which is important for my lathe as I dont want to exceed the operational limits by turning too heavy a block. You can also see a line on the side-Ive drawn that line on the edges of the boards to keep the end grain patterns lined up:
Im going to use carpenters glue and an old pain brush to spread the glue around. Ive also laid down a plastic trash bag to help keep some of the glue off of my work bench:
I cleaned all the wood dust off of the surfaces and applied a very thick bead of glue:
Next I spread the glue evenly across the surface, making sure that the edges have a thick, even layer:
And I did that repeatedly. Here is what the whole thing looks like at the moment:
Now, for difficult part: clamping the whole thing together. Laminated turning blocks need to be really solid and this means having enough clamps to produce even, hair-line joints in the block and ultimate in the bowl itself. I used as many clamps as I can fit around the edge of the block, which in this case was 8 clamps:
Screwing down the clamps always makes the wood shift around a little so its helpful to have a mallet, in the photo you can see I use a plastic mallet, to gently tap it in place:
And then I clamped the hell out of it. Screw it down as tightly as possible. You should see glue oozing out of the sides of the block:
And Im going to let it sit for 24 hours. Well come back to this tomorrow.
VW
I Am Wood Working And So Can You
Issues of Popular Woodworking Magazine always get a bit of a work-over in the blog-o-sphere after its out. Not usually one of those "a few rounds in the ring with Tyson" work-over, more that the folks over there do a talented lot, excellent at more than just woodworking they have a knack for inspiring discussion more so than any of the other magazine publications. This would most likely stem from the fact that Chris Schwarz is a prolific blogger, and bloggers tend to keep up with other bloggers stuff,and this results in more discussion. All a very good thing.
Chris did make me laugh out loud with this most recent issue of Pop Wood in his "On The Level" blurb at the beginning of the magazine. Where he called out the woodworking to community to take up the cause of blogging about woodworking to preserve the knowledge for future generations. I have to say that kind of goal puts only a little more pressure on the quality of my own blog posts, but it did make me think about why I started blogging about my work.
It wasnt necessarily to teach anybody anything, not that Im against teaching, Ill show you anything I know and make up some of the stuff I dont know if you ask me. And it wasnt to brag, if it was that then Id be putting up finished pics and talking about how great I am instead of documenting my mistakes along side my triumphs. It was some about creating a chronicle of my work, Before I started the blog I had been woodworking for about 8 to 9 years, but I had rarely taken a camera into my shop. In fact some things Ive built that have gone to other loving homes, I have no pictures or record of. The more that occurred to me the more it bothered me. How can you know where you want to go if you cant see where youve been. So the camera began to sneak its way into the shop.
Then we moved from LaCrosse Wisconsin to Presque Isle Maine. Just under 1700 miles away from family, friends, and the lives we knew. Why? The usual reason, something that looked like a good job prospect,
 While we were living out there I began a blog about us, my wife, my daughters and myself, so that the folks back at home could keep up with us and we could feel like we were still in touch. A few months in I realized that I could also blog about my woodworking and I started with my first real project done out there, building a real workbench, a hybrid version between the 175 dollar workbench and the Nicholson or English Workbench. It was kind of raw and I fumbled my way through the process. Several times I have been tempted to go back and heavily edit those posts, but I fight it because again, I want to know where Ive come from.
 We have moved back to Wisconsin, with lessons well learned, and the blogging not only continued, but I got a little more serious about it. Blogging about my work is great for several reasons, only one of those reasons is the point Chris brings up about passing along and archiving knowledge, but there are other reasons that are of a direct reward to me. One is blogging keeps me in the shop and motivated. I have a personal goal of making 2 to 3 posts on this blog a week, sometimes I do better, sometimes I do worse, but it averages out. To have something to write about, most of the time I have to have done something. This gets my arse in the shop, and more time in the shop equals better skills, and better skills lead to more ambitious projects, which lead to . . . you guessed it, new blog content, more work, better skills and better projects and outcomes. Its a delightful cycle that can fuel itself. If you need no other reason to blog, I suggest you use this one.
The other big thing blogging has done for me is made my very curious to read other woodworkers blogs, something that had never occurred to me before I forged a beginners blog of my own. This has opened the door to me to become part of an online woodworking community, both through reading and commenting on others blogs but also being inspired to search out other woodworkers on social media platforms like Twitter (shameless plug: you can follow me on Twitter @oldwolfworkshop). This has also given me more of a connection to woodworking than ever before.
As you can see in the left hand side of my blog I follow a good number of the woodworking blogs out there, I enjoy all the content that each of them offers, but tonight Im talking about inspiration more than anything and I want to point out a few blogs as particular inspiration to me. Obviously missing from the list will be Chris Schwarzs multiple blogs, his work goes without saying and needs no further fanfare from the likes of little ol me.
First I am going to start with one of the heavy hitters from the list, Peter Follansbee, and his blog Joiners Notes. Peter is a gifted woodworker who focuses all of his attention to working with hand tools only, using period joinery and carving techniques from the 17th century. You can tell from the execution of his blog that his work flows in an effortless practiced way that comes from a great amount of study, practice, and familiarity. I love his articles and how they delve past the "this is how you can do this" layer of work and into the thoughts and broad knowledge base behind the work. I feel smarter every time I read a post from his blog and I look forward to every one.

Next is a man who is a blogging machine, I am very happy if I can get up 2 to 3 posts a week. This guy posts

Heres a confession, I am definitely not a podcast kind of guy. I will watch a video if I feel its right up my alley but generally speaking I get more from reading and pictures than I do from listening, maybe its just me but my attention span checks out. That means that I dont get as much out of some great blogs like the Wood Whisperer, Renaissance Woodworker, or the Logan Cabinet Shoppe. (These guys all have great regular blog content as well, and are top notch, Im not knocking them I just dont always get as much from their blogs as other probably do) But to every rule there is an exception, and my exception is Matt Vanderlist and his Spoken Wood Podcast, where he features blog posts written by others yet recorded read out loud, either by the author, or by Matt himself. The fact that he links back to the original post in his show notes helps me as I can go and look at the post while Im listening, now the content really hits home.

Dyami is fairly new to the blog-o-sphere as he has only been posting at The Penultimate Woodshop for about 2 months as I write this post, but he is a great example of everything that is great in blogging. When I find new blogs, one of my favorite things is to go back and read the very first thing they posted, Dyami writes exactly about the reason people often dont blog, in fact the same hurdle I had to jump myself to start typing, the great question "Compared to those guys out there, what value can I possibly add?" and hes a perfect example of why that thinking is wrong. You should definitely be reading what hes up to, theres good stuff here.

When I started a hand tool only odyssey a year ago there were tools I wanted to use, but I could not find them as a "non antique" for an affordable price. What was I to do? Then I found Leif at the Norse Woodsmith, and began to read his blog. There is a ton of information over here on maintaining hand tools and even making some from scratch. (Making my own floats following his example is fast approaching on my do do list). A quick look at his archives told me he has been placing his quality content on the net since 2004, so until I wrote this article I didnt even realize the depths of information that are contained here. Im going back to dip for more as soon as I finish this post, you should come with me.

Rob Porcaro and his blog Heartwood does things just right, He offers a good mixture of well thought out and well written content, from technique to tools to projects. He always has a new little tip or trick he likes to share. Again if you go back and look at the first post he blogs I think he really has the philosophy correct and verbalized better than I could. He talks about an oily rag he keeps in his shop for wiping down tools after use, I keep a similar rag and I think a lot of woodworkers do, but hes right when he says that something like that would never be discussed or covered in a woodworking book or magazine, and then that information is more difficult to pass along to those new to the passion. Rob describes the idea behind his blog is a chance for others to sneak a peek over his shoulder, maybe to be inspired, maybe to just find a different way of doing something. This mirrors what I try to do with my blog.

I should say that the choices I made in which bloggers to feature is like a slice of pie when it comes to getting woodworking information on the internet, I take that back it would be just a bite of a slice of that pie, and even though that bite is sweet on the tongue and lights off a million pleasure sensors in the brain, there is another bite to take after this one, and there is so much more to discover out on the net. I cannot encourage you enough to take up the cause, to read, and start your own blog, You will not only be helping, motivating, and inspiring yourself, but youll be sharing your time and motivation with others.
Cheers
Oldwolf
 P.S. I would be remiss here if I didnt take a second to thank all of my own readers out there. I have been blogging for a little over a year and my hit counter just hit the 5 digit level, thats 10,000+ pages read on my blog and that is indeed a humbling number, Thank you again for all the support and please keep tuning in.
Read More..
Chris did make me laugh out loud with this most recent issue of Pop Wood in his "On The Level" blurb at the beginning of the magazine. Where he called out the woodworking to community to take up the cause of blogging about woodworking to preserve the knowledge for future generations. I have to say that kind of goal puts only a little more pressure on the quality of my own blog posts, but it did make me think about why I started blogging about my work.
It wasnt necessarily to teach anybody anything, not that Im against teaching, Ill show you anything I know and make up some of the stuff I dont know if you ask me. And it wasnt to brag, if it was that then Id be putting up finished pics and talking about how great I am instead of documenting my mistakes along side my triumphs. It was some about creating a chronicle of my work, Before I started the blog I had been woodworking for about 8 to 9 years, but I had rarely taken a camera into my shop. In fact some things Ive built that have gone to other loving homes, I have no pictures or record of. The more that occurred to me the more it bothered me. How can you know where you want to go if you cant see where youve been. So the camera began to sneak its way into the shop.
Then we moved from LaCrosse Wisconsin to Presque Isle Maine. Just under 1700 miles away from family, friends, and the lives we knew. Why? The usual reason, something that looked like a good job prospect,
We have moved back to Wisconsin, with lessons well learned, and the blogging not only continued, but I got a little more serious about it. Blogging about my work is great for several reasons, only one of those reasons is the point Chris brings up about passing along and archiving knowledge, but there are other reasons that are of a direct reward to me. One is blogging keeps me in the shop and motivated. I have a personal goal of making 2 to 3 posts on this blog a week, sometimes I do better, sometimes I do worse, but it averages out. To have something to write about, most of the time I have to have done something. This gets my arse in the shop, and more time in the shop equals better skills, and better skills lead to more ambitious projects, which lead to . . . you guessed it, new blog content, more work, better skills and better projects and outcomes. Its a delightful cycle that can fuel itself. If you need no other reason to blog, I suggest you use this one.The other big thing blogging has done for me is made my very curious to read other woodworkers blogs, something that had never occurred to me before I forged a beginners blog of my own. This has opened the door to me to become part of an online woodworking community, both through reading and commenting on others blogs but also being inspired to search out other woodworkers on social media platforms like Twitter (shameless plug: you can follow me on Twitter @oldwolfworkshop). This has also given me more of a connection to woodworking than ever before.
As you can see in the left hand side of my blog I follow a good number of the woodworking blogs out there, I enjoy all the content that each of them offers, but tonight Im talking about inspiration more than anything and I want to point out a few blogs as particular inspiration to me. Obviously missing from the list will be Chris Schwarzs multiple blogs, his work goes without saying and needs no further fanfare from the likes of little ol me.
First I am going to start with one of the heavy hitters from the list, Peter Follansbee, and his blog Joiners Notes. Peter is a gifted woodworker who focuses all of his attention to working with hand tools only, using period joinery and carving techniques from the 17th century. You can tell from the execution of his blog that his work flows in an effortless practiced way that comes from a great amount of study, practice, and familiarity. I love his articles and how they delve past the "this is how you can do this" layer of work and into the thoughts and broad knowledge base behind the work. I feel smarter every time I read a post from his blog and I look forward to every one.
Next is a man who is a blogging machine, I am very happy if I can get up 2 to 3 posts a week. This guy posts
every
single
day.
His name is Brian Meeks and his blog is called Extremely Average, but it is far from that. Brian is fairly new to woodworking but he is really catching on fast and his progress is fun to watch and, through his blog, he makes you feel like youre participating in the journey. Besides being so accessible in his writing Brians photography is incredibly beautiful. It puts me and my little digital camera to shame. I want him to come and take some photos of my work because I get so jealous of the quality that translates through with his. He is progressing fast and is definitely someone to read, and watch.Heres a confession, I am definitely not a podcast kind of guy. I will watch a video if I feel its right up my alley but generally speaking I get more from reading and pictures than I do from listening, maybe its just me but my attention span checks out. That means that I dont get as much out of some great blogs like the Wood Whisperer, Renaissance Woodworker, or the Logan Cabinet Shoppe. (These guys all have great regular blog content as well, and are top notch, Im not knocking them I just dont always get as much from their blogs as other probably do) But to every rule there is an exception, and my exception is Matt Vanderlist and his Spoken Wood Podcast, where he features blog posts written by others yet recorded read out loud, either by the author, or by Matt himself. The fact that he links back to the original post in his show notes helps me as I can go and look at the post while Im listening, now the content really hits home.
Dyami is fairly new to the blog-o-sphere as he has only been posting at The Penultimate Woodshop for about 2 months as I write this post, but he is a great example of everything that is great in blogging. When I find new blogs, one of my favorite things is to go back and read the very first thing they posted, Dyami writes exactly about the reason people often dont blog, in fact the same hurdle I had to jump myself to start typing, the great question "Compared to those guys out there, what value can I possibly add?" and hes a perfect example of why that thinking is wrong. You should definitely be reading what hes up to, theres good stuff here.
When I started a hand tool only odyssey a year ago there were tools I wanted to use, but I could not find them as a "non antique" for an affordable price. What was I to do? Then I found Leif at the Norse Woodsmith, and began to read his blog. There is a ton of information over here on maintaining hand tools and even making some from scratch. (Making my own floats following his example is fast approaching on my do do list). A quick look at his archives told me he has been placing his quality content on the net since 2004, so until I wrote this article I didnt even realize the depths of information that are contained here. Im going back to dip for more as soon as I finish this post, you should come with me.
Rob Porcaro and his blog Heartwood does things just right, He offers a good mixture of well thought out and well written content, from technique to tools to projects. He always has a new little tip or trick he likes to share. Again if you go back and look at the first post he blogs I think he really has the philosophy correct and verbalized better than I could. He talks about an oily rag he keeps in his shop for wiping down tools after use, I keep a similar rag and I think a lot of woodworkers do, but hes right when he says that something like that would never be discussed or covered in a woodworking book or magazine, and then that information is more difficult to pass along to those new to the passion. Rob describes the idea behind his blog is a chance for others to sneak a peek over his shoulder, maybe to be inspired, maybe to just find a different way of doing something. This mirrors what I try to do with my blog.
I should say that the choices I made in which bloggers to feature is like a slice of pie when it comes to getting woodworking information on the internet, I take that back it would be just a bite of a slice of that pie, and even though that bite is sweet on the tongue and lights off a million pleasure sensors in the brain, there is another bite to take after this one, and there is so much more to discover out on the net. I cannot encourage you enough to take up the cause, to read, and start your own blog, You will not only be helping, motivating, and inspiring yourself, but youll be sharing your time and motivation with others.
Cheers
Oldwolf
P.S. I would be remiss here if I didnt take a second to thank all of my own readers out there. I have been blogging for a little over a year and my hit counter just hit the 5 digit level, thats 10,000+ pages read on my blog and that is indeed a humbling number, Thank you again for all the support and please keep tuning in.Wednesday, February 19, 2014
Hollys Walnut Bowl Discussion and Plans
Hi Everyone,
Today were going to begin a bowl out of black walnut and this bowl is going to be a gift to a very special friend of mine and heres the story about my friend Holly and this particular piece of wood:
I have a wonderful friend named Holly who lives out on a farm with her family and a whole bunch of very friendly chickens in Afton, Minnesota. Several years ago during a strong wind and rain storm a large black walnut tree that was growing on her property, roots gave way and the tree came down. Knowing that I turn wood, Holly told me about the tree and offered to give me the trunk from the tree and so my youngest son and I went out to Afton to get it. As it came down in a rainstorm it was full of water and so it was very, very heavy. I cut the trunk into sections and then split one of the sections in half and made bowl blanks out of them. I tried turning a bowl from one of the blanks but it was just too wet for turning and so I treated the cut ends with Anchorseal and stacked them away.
Fast forward almost 2 years-the blanks are much, much lighter in weight, signifying that the wood is much dryer and ready to turn. I took a portion of one of the blanks and made a small flower vase several weeks ago (and you can see this on the blog). The wood was dry and the vase came out absolutely beautifully. Time to make Hollys bowl and take it to her and the chickens.
Discussion and Plans
I am going to do this project in slow, easy stages as I think this is a good way to illustrate this project. So my first posting today will be about getting the blank ready to be mounted on the lathe and Im also going to show the blank mounted on the lathe at the end of this posting. Subsequent posts will show how the blank is shaped and hollowed out and lastly how it will be finished.
Here we go:
Here is a photo of the bowl blank. Its a big thing, about 6 /12 inches at its deepest and about 9 inches wide and 11 inches long. In order to turn this on my lathe, its going to have to be cut down considerably. So the first thing I did was to find the center of the flat side of the blank. This will eventually be the top of the bowl and since the blank is deep and thick, I can screw down a large faceplate and use long heavy wood screws to do that with:


In this photo is the blank, the faceplate Im going to use, which is 6 inches in diameter, a center finder so I can get the faceplate reasonably centered on the blank, and some long wood screws:

In this photo you can see how large and square this blank is. As this blank is too large to turn on my lathe, it will have to be cut down. Im going to cut off the corners and trim it some and I can do this one of two ways- I can eye-ball it or I can use a small plywood template (see below) and use that while Im sawing it with the bandsaw. You can also hand saw this with a carpenters handsaw:


Heres the blank after Ive sawed off the corners and some of the excess wood. Note the circle in the center. Thats the approximate size of the finished bowl:

The waste wood looks like chocolate pie!

This is a photo of the faceplate and the center finder. Im terrible at estimating where the faceplate should be placed. On this piece of wood its not real critical if I dont get the faceplate absolutely centered but on rounded blanks of wood it is, so I thought Id illustrate this. These two pieces screw together and in the center is a drill bit. I screw everything together and then I put the drill bit in my hand drill and drill the whole assembly into the center point that I found before I began cutting the blank:

Heres the whole thing screwed down. Now I can drill holes for the screws and screw them in:

I used my hand drill for all of this. Much, much easier to do! Now the faceplate is properly centered and screwed on securely:

Now that the faceplate is screwed on, Ive mounted the faceplate-wood blank on to the lathe and spun it by hand and it spins freely so weve gotten the blank on there correctly. Here is a photo of the tailstock and the tool rest in place. Its ready to turn:


And Im going to stop here. Tomorrow Ill begin roughing out the bowl with my roughing gouge. Tomorrow is going to be a really dirty, messy day but well wind up with the exterior of the bowl cut and shaped.
While I was working, UPS delivered a wood blank from Wood Turning Blanks 4U in Braedon, Florida. This is a wonderful source of turning wood and Steve and Diane, the couple who operate this, do a superb job of processing wood from trees that have fallen in storms or had to be removed for some reason. This keeps these marvelous sources of turning wood from either being ground up for mulch or dumped in a field somewhere. You can check our their site at: http://www.woodturningblanks4u.com/. I wish they would move to Minnesota.
Anyway, this blank is going to be the basis of another future project that well do together. This is silky oak:

Ok, its cold and were due for more snow this afternoon. Time to go in and talk to the cats. See you tomorrow.
VW
Read More..
Today were going to begin a bowl out of black walnut and this bowl is going to be a gift to a very special friend of mine and heres the story about my friend Holly and this particular piece of wood:
I have a wonderful friend named Holly who lives out on a farm with her family and a whole bunch of very friendly chickens in Afton, Minnesota. Several years ago during a strong wind and rain storm a large black walnut tree that was growing on her property, roots gave way and the tree came down. Knowing that I turn wood, Holly told me about the tree and offered to give me the trunk from the tree and so my youngest son and I went out to Afton to get it. As it came down in a rainstorm it was full of water and so it was very, very heavy. I cut the trunk into sections and then split one of the sections in half and made bowl blanks out of them. I tried turning a bowl from one of the blanks but it was just too wet for turning and so I treated the cut ends with Anchorseal and stacked them away.
Fast forward almost 2 years-the blanks are much, much lighter in weight, signifying that the wood is much dryer and ready to turn. I took a portion of one of the blanks and made a small flower vase several weeks ago (and you can see this on the blog). The wood was dry and the vase came out absolutely beautifully. Time to make Hollys bowl and take it to her and the chickens.
Discussion and Plans
I am going to do this project in slow, easy stages as I think this is a good way to illustrate this project. So my first posting today will be about getting the blank ready to be mounted on the lathe and Im also going to show the blank mounted on the lathe at the end of this posting. Subsequent posts will show how the blank is shaped and hollowed out and lastly how it will be finished.
Here we go:
Here is a photo of the bowl blank. Its a big thing, about 6 /12 inches at its deepest and about 9 inches wide and 11 inches long. In order to turn this on my lathe, its going to have to be cut down considerably. So the first thing I did was to find the center of the flat side of the blank. This will eventually be the top of the bowl and since the blank is deep and thick, I can screw down a large faceplate and use long heavy wood screws to do that with:
This photo shows the blank with the center marked out:
In this photo is the blank, the faceplate Im going to use, which is 6 inches in diameter, a center finder so I can get the faceplate reasonably centered on the blank, and some long wood screws:
In this photo you can see how large and square this blank is. As this blank is too large to turn on my lathe, it will have to be cut down. Im going to cut off the corners and trim it some and I can do this one of two ways- I can eye-ball it or I can use a small plywood template (see below) and use that while Im sawing it with the bandsaw. You can also hand saw this with a carpenters handsaw:
Heres the blank after Ive sawed off the corners and some of the excess wood. Note the circle in the center. Thats the approximate size of the finished bowl:
The waste wood looks like chocolate pie!
This is a photo of the faceplate and the center finder. Im terrible at estimating where the faceplate should be placed. On this piece of wood its not real critical if I dont get the faceplate absolutely centered but on rounded blanks of wood it is, so I thought Id illustrate this. These two pieces screw together and in the center is a drill bit. I screw everything together and then I put the drill bit in my hand drill and drill the whole assembly into the center point that I found before I began cutting the blank:
Heres the whole thing screwed down. Now I can drill holes for the screws and screw them in:
I used my hand drill for all of this. Much, much easier to do! Now the faceplate is properly centered and screwed on securely:
Now that the faceplate is screwed on, Ive mounted the faceplate-wood blank on to the lathe and spun it by hand and it spins freely so weve gotten the blank on there correctly. Here is a photo of the tailstock and the tool rest in place. Its ready to turn:
Now before I begin turning this there is one last thing to do and that is to cut away a small section of tree bark were the tailstock is inserted. This will let me screw the tailstock firmly into solid wood instead of the bark, which is spongy and crumbly. Never screw anything into bark:
And Im going to stop here. Tomorrow Ill begin roughing out the bowl with my roughing gouge. Tomorrow is going to be a really dirty, messy day but well wind up with the exterior of the bowl cut and shaped.
While I was working, UPS delivered a wood blank from Wood Turning Blanks 4U in Braedon, Florida. This is a wonderful source of turning wood and Steve and Diane, the couple who operate this, do a superb job of processing wood from trees that have fallen in storms or had to be removed for some reason. This keeps these marvelous sources of turning wood from either being ground up for mulch or dumped in a field somewhere. You can check our their site at: http://www.woodturningblanks4u.com/. I wish they would move to Minnesota.
Anyway, this blank is going to be the basis of another future project that well do together. This is silky oak:
Ok, its cold and were due for more snow this afternoon. Time to go in and talk to the cats. See you tomorrow.
VW
Monday, February 10, 2014
Mouldings Miters and More
Hollows and Rounds

My new hollows and rounds arrived on Friday from Philly Planes in England, right on schedule as Phil Edwards told me. They looked and smelled great(new tools always smell so good), right out of the box all packaged up safely making the trip across the pond. He threw in a nice Philly Planes T-Shirt as well! A nice touch indeed...This morning I set aside a few hours and finally made some shavings and Im very happy to report that theyre great! Worth every cent which I should note wasnt out of touch by any means for some custom made hand planes. They have a nice, traditional shape, comfortable to hold and a nice light weight; Phil had mentioned some additional honing may be necessary but not before theyre put to work awhile. He did a great job and I will recommend them to anyone interested in wooden bodied hand planes.
As you know if youre a frequent reader here I have a new project Im starting this week. Im building a solid exterior wooden door for a heritage property here in Toronto and this is what the planes were specifically purchased for. Wanting to take the planes for a test drive I decided to work on a sample section of one of the mouldings on the door; this will be the trim around the panels and Ill need about twenty running feet of this particular profile. I cut a scrap of poplar I had about 28" long and squared it up to begin. The following process represents a brief description of the steps in sticking traditional mouldings.

To begin the moulding I first had to dimension the stock to size and this started with ripping it to width followed with some jointing with my 5 1/2 Bench plane. With the stock straight and square Ill lay out the moulding profile at each end and figure out my rabbet and dado configurations. Funny when sticking mouldings, we think of the hollows and rounds first and foremost but the reality is that most of the bulk of the material will be removed with a rabbet and plough plane. The hollows and rounds follow to the create the curves, slopes and fair out the sharp edges left behind by the first special purpose planes.

The rabbet and plough plane Im using are Veritas with my Lie Nielsen medium shoulder plane to clean up the inside corners. I used my right handed Lie Nielsen as well to put the small rabbet on the opposite side of the profile, this was a luxury having the right handed plane to deal with the grain direction. The curves of the moulding is squared off with a series of rabbets determining each stepped area. This process continues on until all that is left is a small dado and then again with my shoulder plane the edges are beveled. This was a tip I got while watching Don McConnells moulding making DVD; he states the you should always relieve any sharp edges before going to the moulding planes to help preserve the shape of the hollows and rounds. Actually, that tip as well as this entire process was demonstrated quite clearly in Dons excellent video- I recommend anyone planning on doing this kind of work watching it.

The moulding planes are a real pleasure to use, with a nice fine shaving its very therapeutic work...this is a good thing considering the amount of moulding Ill have to make for this door project! The finish left behind from the hollows is quite incredible, a smooth burnished feel that doesnt come across in photographs but really is something to behold. The entire process up to this point was probably no more than an hour for this piece just over two feet long.

With the profile complete Ill put it aside to get ready to cut some miters, this will be another important stage of the door project. Lots of mouldings with twice the miters. I found a great old Stanley miter hook at a yard sale last year for $15.00- a sweet deal for this appliance it needed a little work but otherwise was in real good shape.

These miter cuts are purely for practice so lengths are a non-issue. This being only a sample the miter will really show me how even my profile is along its length. From here its to the shooting board to clean up the saw cut and I can finally see how it looks.

Im using my new shooting board with my Lie Nielsen NO. 9 for this final step. I still didnt make a 45 degree fence for this new board so I used the block portion of my combination square...this worked out well and its time to check the final fit.

Im happy with this and am looking forward to getting into some quarter sawn White Oak later this week.
Stay tuned.

Read More..
My new hollows and rounds arrived on Friday from Philly Planes in England, right on schedule as Phil Edwards told me. They looked and smelled great(new tools always smell so good), right out of the box all packaged up safely making the trip across the pond. He threw in a nice Philly Planes T-Shirt as well! A nice touch indeed...This morning I set aside a few hours and finally made some shavings and Im very happy to report that theyre great! Worth every cent which I should note wasnt out of touch by any means for some custom made hand planes. They have a nice, traditional shape, comfortable to hold and a nice light weight; Phil had mentioned some additional honing may be necessary but not before theyre put to work awhile. He did a great job and I will recommend them to anyone interested in wooden bodied hand planes.
As you know if youre a frequent reader here I have a new project Im starting this week. Im building a solid exterior wooden door for a heritage property here in Toronto and this is what the planes were specifically purchased for. Wanting to take the planes for a test drive I decided to work on a sample section of one of the mouldings on the door; this will be the trim around the panels and Ill need about twenty running feet of this particular profile. I cut a scrap of poplar I had about 28" long and squared it up to begin. The following process represents a brief description of the steps in sticking traditional mouldings.
To begin the moulding I first had to dimension the stock to size and this started with ripping it to width followed with some jointing with my 5 1/2 Bench plane. With the stock straight and square Ill lay out the moulding profile at each end and figure out my rabbet and dado configurations. Funny when sticking mouldings, we think of the hollows and rounds first and foremost but the reality is that most of the bulk of the material will be removed with a rabbet and plough plane. The hollows and rounds follow to the create the curves, slopes and fair out the sharp edges left behind by the first special purpose planes.
The rabbet and plough plane Im using are Veritas with my Lie Nielsen medium shoulder plane to clean up the inside corners. I used my right handed Lie Nielsen as well to put the small rabbet on the opposite side of the profile, this was a luxury having the right handed plane to deal with the grain direction. The curves of the moulding is squared off with a series of rabbets determining each stepped area. This process continues on until all that is left is a small dado and then again with my shoulder plane the edges are beveled. This was a tip I got while watching Don McConnells moulding making DVD; he states the you should always relieve any sharp edges before going to the moulding planes to help preserve the shape of the hollows and rounds. Actually, that tip as well as this entire process was demonstrated quite clearly in Dons excellent video- I recommend anyone planning on doing this kind of work watching it.
The moulding planes are a real pleasure to use, with a nice fine shaving its very therapeutic work...this is a good thing considering the amount of moulding Ill have to make for this door project! The finish left behind from the hollows is quite incredible, a smooth burnished feel that doesnt come across in photographs but really is something to behold. The entire process up to this point was probably no more than an hour for this piece just over two feet long.
With the profile complete Ill put it aside to get ready to cut some miters, this will be another important stage of the door project. Lots of mouldings with twice the miters. I found a great old Stanley miter hook at a yard sale last year for $15.00- a sweet deal for this appliance it needed a little work but otherwise was in real good shape.
These miter cuts are purely for practice so lengths are a non-issue. This being only a sample the miter will really show me how even my profile is along its length. From here its to the shooting board to clean up the saw cut and I can finally see how it looks.
Im using my new shooting board with my Lie Nielsen NO. 9 for this final step. I still didnt make a 45 degree fence for this new board so I used the block portion of my combination square...this worked out well and its time to check the final fit.
Im happy with this and am looking forward to getting into some quarter sawn White Oak later this week.
Stay tuned.
Subscribe to:
Comments (Atom)