Wednesday, March 5, 2014
From 3D Model to Shop Plan A Workflow Example
The other day a friend of mine was asking me about how I go from a 3D model in SketchUp to a plan or shop drawing. He was looking for an efficient way to do the same thing so he can spend more time in his shop. My approach is pretty straightforward and it works for me for any type of project. For this example I am using the model I did for the Walnut Night Stand project from the current Getting Started in Woodworking series. You can download the plan for this project if you wish.
After I have drawn the entire assembled model I create the layers Ill use for organization. It is important to keep in mind that in SketchUp, the only purpose for layers is controlling the visibility of entites. If you arent familiar with the use of layers in SketchUp, take a look at this blog post. Remember to keep Layer 0 as the active layer. The layers are given names to suit the parts that will be associated with them. In this case its short list: Aprons, Dowels, Hardware, Legs, Shelf and Top.
After I create the layers, I turn off their visibility by unticking the boxes to the right of their names. Then I make the layer associations. To do this, open the Entity Info box. Select the component(s) whose layer association you want to change and the select the desired layer from the drop down list. If your model is complex, you might want to select the components from the Outliner instead of selecting them in the drawing. This can save you time making sure you have all instances selected without having to chase around the model. Since the layer visibility has been turned off for all but Layer 0, as you make the layer associations, the components will disappear.
When youve made all of the layer associations, you should have a blank drawing window. If theres anything left, you should investigate. If it is loose geometry, is there geometry missing from a componet? Are they just stray lines that dont belong to any components? Deal with them by either adding them into the proper component or deleting them. It wouldnt hurt to hit Zoom Extents and make sure you dont have stray line segments off in the distance. Delete those as well.
In addition to layers created for the components, you may also want to add layers for dimensions and other text. I add all dimensions and text in LayOut so I dont have those layers in the model. I also add dashed lines in LayOut instead of SketchUp but if I were putting them into the model, I would also create a layer for them.
Next I turn on all the layers and begin to set up the views I need for the plan. I typically make a three-quarter perspective view along with 2D front and side views. Each of these is set up as a Scene. You can either go to View>Animation>Add Scene or open the Scenes dialog box and add them there. To make the exploded view, I copy the model off to one side and pull the components in that copy apart as needed. I also copy off components for detail views. In the view above I have all of the layers turned on so you can see how the parts are spread out out. I can control what is visible in each scene by ticking or unticking the visibilty boxes for the layers. You can see that the shelf and top overlap each other above the exploded view but since their visibility can be controlled, they dont show as overlapping in the plan. You can also see Ive made rotated copies of the various parts to create two views of the same part in one scene.
Once the scenes are created it is time for the plans. If you have the pro version of SketchUp, this would be the time you would save the file and then send it to LayOut. If you are using the free version, you would add in the dimensions and text as needed to the various scenes. You might wait until this point to add the layers for the dimensions and text. You might want to make layers to match each scene so that the dimensions for the top can be hidden when you are looking at the shelf and vice versa. You could put the dimensions for the top on the same layer as the top. This might cause you problems if you have some scenes in which you want to see the components but not the dimensions.
Keep in mind that Screen Text remains in a constant position on the screen. If you insert screen text, itll show in the same place in each scene unless you give it a layer association and turn that layer off when you dont want the text.
If you are using LayOut, youll simply export a PDF file when youre finished. In the free version of SketchUp you can either print each scene directly from SketchUp or export images of each scene.
If you do the latter, you can import them into a word processor or other application and arrange the images as needed. Then you can make a PDF or just print the file and head off to the shop.
If you have the need to do much of this sort of thing, youll probably find that LayOut makes it a lot easier to get to the final document. One of the big benefits of using LayOut is that if you find a need to edit the model after youve created the document, the views in LayOut can be updated automatically.
Click Here and Start WoodWorking
Tuesday, March 4, 2014
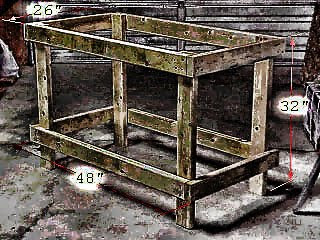
Building a Simple and Cheap Woodworking Bench

 5. How to assemble the frame assembly
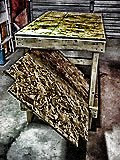 6. How to install the lower shelf
Monday, March 3, 2014
Make a table saw miter sled
Since I seem to be getting backlogged on pictures that need framing, I built a new miter sled this week. It is much easier to make than the old one. And youll get perfect mitered corners every time!
Plans:
- SketchUp design
- PDF plans
Bonus video!
I experimented with making a plywood picture frame for a print Ive been wanting to complement with something unusual. I like the notion of embracing the plywoods edges and featuring them. I also experimented with using kitchen food coloring as a wood dye. Worked out fine!
Friday, February 21, 2014
How To Build A Woodworking Bench Woodworking Plans

How To Build A Woodworking Bench
Woodworking Plans
Do-it-Yourself Patterns and Crafts, Woodworking kits, Furniture Plans Plus Much, Much More. Will Show You How to Make 16,000 Different Woodworking Plans. Use The Plans For Fun, Functionality or Profit!
How To Build A Woodworking Bench. Wood is a single of the most stunning, tough and versatile materials that you can work with while on a do it oneself project. The beauty of a cabinet door that is finished in wood cannot be matched by any other material regardless of whether natural or man made. As with any project, you would call for a detailed set of plans whilst you function with wood and wood primarily based components. This is why it is suggested that you use a detailed set of woodworking plans when you plan to extensively use wood based materials to comprehensive the project that you have embarked on.
Now let us examine why woodworking plans are important in any wood primarily based do it oneself project. To start with, these plans assistance you do achoice with waste. If you begin a woodworking project with out a firm plan, the chances are that you would finish up employing extra wood that you initially intended to. Most of the wood primarily based projects would require substantial assemblies and sub assemblies.
When you begin your project, you would be ideally functioning with person members of wood and finishing them individually just before assembling them. If you do not have the suitable woodwork plans, you could finish up with mismatching wood members at the time of assembly. This could result in highly-priced price and time overruns in the project. All these difficulties can be avoided by utilizing a properly laid out set of wood plans.
The other advantage that you could have if you use woodworking plans are that you would be prepared with all the tools and implements that you would call for for completing the wood primarily based project. Typically we uncover that we do not have access to a specific tool in the middle of a woodworking project. This situation could lead to a loss of time and at times you may even have to abandon the project in case a particular tool is not readily available. All these problems can be avoided if you have a detailed program at the onset. How To Build A Woodworking Bench

How To Build A Woodworking Bench Data
Constant Advertising - The romance of woodworking will want to be balanced with the constant advertising and marketing vital to retain the operate coming in. In time, phrase of mouth brings in a lot of operate if you create a good reputation. Until finally then, you will want to get the phrase out routinely. Right after the perform arrives in you have to have fantastic manufacturing systems so you can complete the tasks promptly and continue to preserve the cash flowing. If jobs think about also pretty long and the dollars movement stops, it can turn into tricky to shell out the costs. Talking of money flow, you should really construct and adhere to common assortment methods. This is 1 area where by quite a few woodworkers fail. The payment for the carry out will need to be as significant as the carry out by itself. If you are lax in accumulating, you will run into prospects who fall quick to shell out you and this will lead to really really serious revenue movement troubles.The Compact business enterprise - Even having said that you like woodworking, you will require to do the property business enterprise if you are to make a dwelling at it. Great results normally needs an in-depth info of both woodworking and enterprise management. If you under no circumstances have every single, I suggest you hesitate to leap in till you have honed your enterprise capabilities.
Seeking back once more I recognize that my lack of information in the course of my startup really a couple of decades back could have been offset with some typical information and a further particular person to advise me.Sadly I had to understand most elements by trial and error.
Just about every and each and every and each week, I take the time to go by means of the comments that my viewers make about my woodworking internet site. 1st of all I want to them for taking the time to comment, I certainly value all of the comments and tips. This previous week there was a comment from a gentleman, who expressed a need to get into woodworking. As a man who is passionate about woodworking, I want to welcome him to the fold. And I want to supply you him all of the recommendations and encouragement probable in his endeavors.How To Build A Woodworking Bench
How To Build A Woodworking Bench :
Tag : How Do I How To Build A Woodworking Bench, How To Remove How To Build A Woodworking Bench, Best Reviews Of How To Build A Woodworking Bench, How Do How To Build A Woodworking Bench, Who Sells How To Build A Woodworking Bench.
Tuesday, February 18, 2014
Just Like A Real Artist

All children are artists. The problem is how to remain an artist once you grow up.
-Pablo Picasso
In a phone conversation with a recent client he told me how he really liked my carving work, he said, "Its like youre a real artist."
I have to admit I wasnt sure how to respond, The problem is I think I have always thought of myself as an artist, it just took me several years to find a medium I love.
Ratione et Passionis
Oldwolf
A Sanctuary Of Sorts
It was not an acute anger, one filled with immediacy and a desire to instantly set the world on fire. It was one of those slow boiling fumes, like a layer of lava underneath a delicately thin cooled crust. The heat still radiated outwards as a warning to those nearby but any accidental brush against the shell would break free a small eruption of consuming flare.
Every time I tried to contain myself from unfairly snapping or doing something I knew I would regret I could almost envision the scene in the movie "The Matrix" when Neo flexes his muscles and the hallway bends around him, eventually snapping back and reverberating like a wave moving out from his disturbance of reality. I could almost harness all that power with my willful rage.

It was the fault of nobody in particular. The unfortunate combination of a very restless nights sleep, spending the day working with a very demanding and narcissistic surgeon, getting a very late chance at a lunch break, and a hundred other small jabs or nips at my psyche throughout the day. Things I can normally shake off easily, stuck like glue today, and the load of them weighted me down to the most base version of myself. I was sarcastic and short with my children, I snapped at my wife when she was just trying to tell me some news that only seemed to pile on.
I spent my afternoon being much less than the person I would like to think I am.
I needed to separate myself for a while. A self imposed time out.
I stuffed in a pair of earphones and retreated to the shop. I knew if I tried to accomplish anything constructive it would only end in tears and possibly blood. So I just stood there for a while, my hands on the bench, my head bent down, and my eyes closed. Pearl Jam pouring into my ears as my meditative breaths brought my shops slightly piney sawdust scent into my nose and my fingertips absently caressed the grain of the benchs timber.
Eventually I picked up my head and started to look around. Im usually good at keeping my shop clean and organized but I had left out a handful of things. My marking knife and small tri-square absently lying over here. A mallet out of place over there. Some carving chips that had escaped the shop vac strolling around the workbenches legs. My joinery saws had been put away out of order the last time my daughter used them and my off cuts were a mishmash pile of chaos.

I picked up the marking knife and turned it around in my hands. Its comfortable and familiar weight felt right in my hands. I inspected the edge and decided it was still sharp and in good shape. I walked over and put the knife carefully back in its plastic, protective sheath and stowed it away in my tool chest. The tri-square followed as did the mallet. Slowly I just started to pick up and organize the scattering of items I had left about. Finishing by sweeping and vacuuming the floor. It took me less than a half hour and when I was done I felt better, not perfect but better.
I found my wife and apologized, I also apologized to my girls. Then I started cooking dinner, something everyone likes, Alfredo noodles and meatballs. While I was boiling the Penne I thought about a passage I remembered from "The Anarchists Tool Chest." and after supper I had to go and look it up.
"When I am too exhausted , ill, or busy to work in my shop, I will shuffle down the stairs to my 15 x 25 workshop and simply stand there for a few minutes with my hands on my tools."
Today is over and Im putting it where it belongs, behind me. Tomorrow will probably be better, but if it isnt at least Im lucky enough to have a sanctuary where I can reset my psyche to equilibrium.
Now that Ive shared way more than I probably should Im going to go, before I confess the secret recipe for my wifes famous "Six Pound Cookies."
Ratione et Passionis
(Reason and Passion)
Oldwolf
Thursday, February 13, 2014
A Rack For Her Glue Gun Part I
 |
| The pin that started it the odyssey. |
 |
| Starting on the rack. |
 |
| Figuring out where things will go. |
 |
| Dominos anyone? |
 |
| Rough shaping prior to assembly. |
Next time, well glue up and begin shaping.
Dont forget about the +Modern Woodworkers Association Podcast. We talk woodworking with Guests from around the world of woodworking every other week. Subscribe to the RSS feed or iTunes today.
Monday, February 10, 2014
A Review
Heres a review (the first I believe) of Made by Hand by Jim Voos of San Carlos, California. Jim is a former College of the Redwoods student and these are his thoughts-
Tom Fidgens Made by Hand is a great book to add to your shop. It is useful to both the beginning hand tool woodworker and the experienced furniture maker as well. Let me explain.
For beginners, Tom takes you through the practical reasons for setting up a hand tool shop, the basic set of hand tools you will need to be productive, as well as some of the techniques that you will need to use these new tools.
For the experienced woodworker, it presents the evolution that many of us go thru in our discovery of the craft, from using power tools in a cramped space, to the use of hand tools to add a new dimension to our work. I found many parallels between Toms experience and my own, although I dont think it has taken Tom the 30 years its taken me to get there.
The other thing that I found terrific was the photography of the workshop, tools & techniques that one uses in building great furniture. This is coffee table quality photography in a book that you will want to keep with you on your bench.
The best part is saved for last, and thats the projects. These are beautiful examples of projects that you will be excited to build. I was particularly taken by the Cabinetmakers Tool Chest. This is a nice piece which can hold your "travelin" hand tools, and incorporates some nice ideas to make it even more useful. I wont give away some of the tricks added to this piece, you will have to discover it for yourself.
I dont know if this is Toms first effort or not, but I hope he continues writing, and gives us a good book we could use to build our own boat using hand tools. This would be another reference I would love to add to my library.
Highly recommended.
Jim Voos

Jim and Jim at the College of the Redwoods
A Dedicated Sharpening Bench part 1
"The best hand tools in the world are worthless in the hands of the woodworker who cannot sharpen them."
 After reading and experimenting with, practicing and then studying the different techniques of sharpening Ive come to settle on a system that is working for me in my current shop space and thats good! A freshly sharpened hand tool can turn the most challenging joinery tasks into wonderful and relaxed procedures. Your work will be cleaner with tighter fitting joinery and your tools will perform as they were intended to the day they were made. The joys of working wood will be that much the greater.
In my own basement work space here in Toronto, Ive followed the line and Im happy with my results; but something Im not happy with and have been promising myself for months to address is my sharpening location and current set-up.
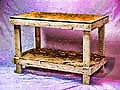
One day last year, I noticed a neighbour throwing out a small wooden table. I snatched it up, rescuing it from the eternal wasteland of the land fill site and have been using it as my sharpening table ever since. Prior to the table I was using a sharpening hook system I designed awhile ago. It was basically an over-sized bench hook with some cleats to hold water stones and a side area for stone storage. The sharpening hook worked when my bench top wasnt cluttered, (which if you know me you know that it hasnt happened much this past year!) so the routine of moving my work project or tools to make room for the sharpening hook soon became tiresome. The small throw away tables footprint has also become reminiscent of a drunken sailor on shore leave so Ive finally decided, with a little help from Fine Woodworking.com, to build a new bench dedicated to sharpening.
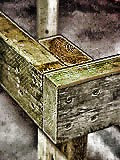
A small scale workbench with large scale workbench strength. The frame has mortise and tenon joinery with a solid 1" thick work surface that has bread board ends fitted into a heavy, through dovetailed apron.
It has a tool tray featuring a unique and convenient way of actually holding tools ! (not just for the hamsters anymore) and Ive added some off the shelf items that will also add to the -dare I say- pleasure of sharpening?
Do you currently have a dedicated sharpening area? Is it a re-used piece of furniture or maybe a purpose made table or bench? Id love to hear about it- be part of the discussion and share some thoughts.

In the next post Ill assemble my cut list and get right into the project with some stock preparation and Ill glue-up the top panels...stay tuned.
Thursday, February 6, 2014
A fotografia no meus trabalhos The photography in my work


Wednesday, February 5, 2014
Time to start a new project
 Looks like this project is going to be on hold for a while, we are now talking about a major bathroom renovation...
There will be three cabinets above the fridge, one below the existing counter along with a drawer, a broom closet to the other side, and a slant front cabinet between the new cabinets and the existing upper cabinets.
And of course the fridge will fill the large vacant area. Im also adding 4 sliding shelves to the island cabinet across from this area, but dont think I need to draw that up.


Monday, January 27, 2014
Its Nice To Have a Little Pot Around the Shop
There was a time when I thought only cheap furniture was made using veneer. Amazing what you learn when you read a book.


- There is a half inch of space all around the inner pot which would be perfect for holding heated water.
- There is the hole in the top of the inner pot aligned with that space that would be perfect for letting off steam.
- There is a handle attached to the inner pot which would make removing it easy to top-up the water bath when it runs dry and through its use, would make it unnecessary for the user to touch the heated base.
- Brass is the third most conductive metal for heat available.
- If it isnt a glue pot, it sure as hell is one now!
Making a simple wall shelf


Saturday, January 25, 2014
Q A Shavonda A Home Full of Color
I adore her recent hallway transformation! Painting the ceiling coral really makes the space!! Her kitchen redo is also fabulous, make sure to pop over and take a look! or maybe her aqua bookshelves - I cant decide, They are all SO good! :)
Take it away Shavonda!

Hi Everyone! Im Shavonda and I blog over at A Home Full Of Color. Thank you all so much for letting me hang out with you for a bit today and thank you Sarah for having me. Im sure I dont have to tell you guys how awesome Sarah is. I just love her work. Shes definitely one of my blog idols and its an honor to be here. For those of you who arent familiar with me I have an affinity for colorful, eclectic interiors, glossy furniture, old houses, giraffes, and the Dallas Cowboys! I also a little obsessed with rearranging furniture. Here are a few other tidbits about me....


I like using candles, fresh flowers or a plant, and art to freshen up a room. Art is such an easy and commitment free way to decorate a room. Candles add warmth and flowers and plants give a room life. More info here.


Without a doubt my biggest fail has been our first attempt at adding a chalkboard wall to our kitchen. I learned that MDF boards + liquid nails + indecision = holes in walls. I also learned how much rebuilding a wall sucks. Drywall is definitely something I will pretty much always leave to the professionals.

And though I HATE painting cabinets, I love what a couple coats of paint did for your hallway and kitchen. More info here.


Im totally in love with kilim.


I too love eggnog!! YUM!!
Thanks so much for sharing today Shavonda!!